Garden Strategies
- This is the strategy page for the minigame. For mechanics, see the Garden page.
Mutation Setups
Common setups
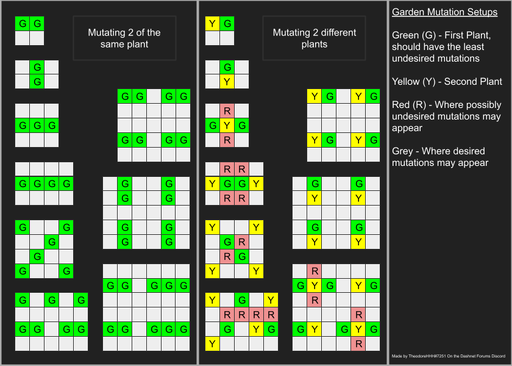
The first half of the picture shows examples of optimal plant setups for each Garden level when trying to mutate a new crop from 2 parents of the same species (example: Thumbcorn from 2 Baker's Wheats). Green squares (labeled with a "G") indicate planted crops. Empty squares indicate locations for potential mutations.
The second half shows examples of optimal setups for each Garden level for mutations from 2 different parents (for example Cronerice from Baker's Wheat and Thumbcorn). The green and yellow squares (labeled with a "G" and "Y" respectively) indicate the 2 types of planted tiles. The light red squares (labeled with an "R") indicate plots that could grow unwanted crops resulting from the mutation of 2 "G" plants. For example, growing Baker's Wheat and Gildmillet may spawn unwanted Thumbcorns in the R plots if the wheat is in the "G" plots (but not when the wheat is in the "Y" plots, as 2x Gildmillet does not have any mutations).
Rules for how to place which parent in which slot (from most to least priority):
- If one of the parents passively spread itself (Crumbspore, Doughshrooms, etc.), place in the "G" plots.
- If one of the parents can have mutation with another instance of itself (Baker's Wheat, Thumbcorn, Cronerice, Ordinary Clover, etc.), place in the "Y" plots.
For the second chart, level 6 can be altered to remove its unwanted plots by using the setup for level 7 without the empty top row. However, this uses up one more space in the grid, meaning there is one less space for a new plant to grow. This is optimal if you are not actively managing your Garden to remove unneeded or unwanted plants.
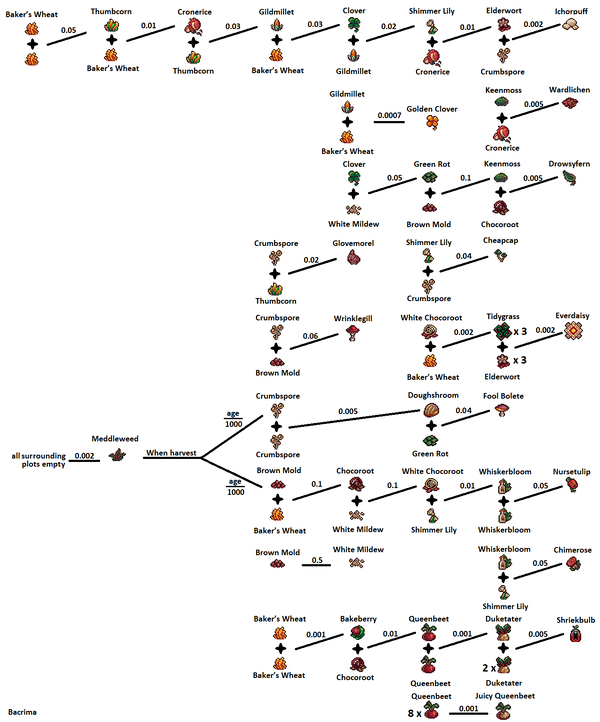
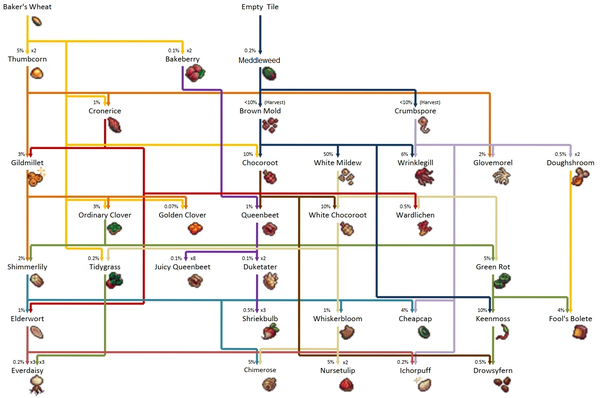
Mutation Tree
Golden Clovers
Golden Clovers are both one of the most useful plants in the garden due to their use for Golden Cookie combos, and one of the trickiest to obtain because of their incredibly low mutation rate. There are two competing strategies to mutate Golden Clovers, with their own upsides and downsides:
- You can crossbreed Baker's Wheat with Gildmillet by using strategies from the above image. Make sure that you are using more Gildmillets than Baker's Wheats, as 2 Baker's Wheats can cause unwanted mutations while 2 Gildmillets cannot. This yields the highest mutation rate, with a mutation probability of 5.09% every tick when using the optimal setup with Wood Chips on the largest garden size; make sure to have more or equally as many gildmillets as there is Baker's Wheats, to reduce wheat to wheat mutations to a minimum. However, this setup requires very active maintenance due the plants' short lifespan and the very high probability of getting unwanted Ordinary Clover mutations. The optimal strategy is to first plant Gildmillets, then add the Baker's Wheats 5 ticks before the Gildmillets mature, and replant the Baker's Wheats once the first ones die. Don't forget to regularly get rid of the Ordinary Clovers (ideally, on every tick). With this strategy, you will have a roughly 57% chance of getting a Golden Clover mutation before your Gildmillets die, which takes about 2 hours and 20 minutes.
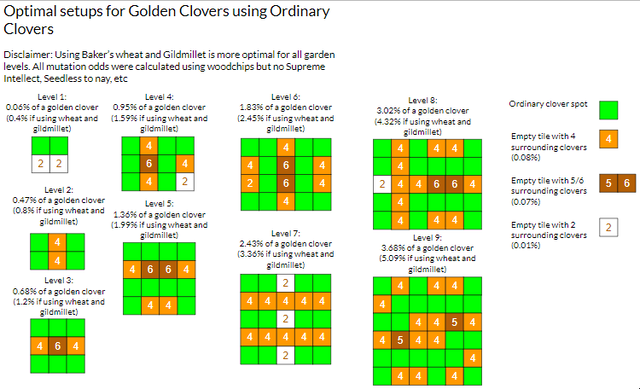
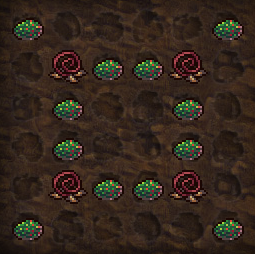
- Alternatively, Golden Clovers can be mutated from sets of 4 Ordinary Clovers with a probability of 0.07%, and sets of 2 Ordinary Clovers with reduced chances (0.01%). The optimal garden setups can be found in the picture below. With the optimal setup on the largest garden size, the resulting mutation probability is 3.68% per tick, which is noticeably lower than the first strategy, and the probability as garden size decreases decreases a lot faster than the first strategy does, rendering it completely unsuitable for small gardens. However, this method requires less maintenance and is better suited for more passive playstyles with the biggest garden size, due to the Ordinary Clovers' longer lifespan and the lowered amount of unwanted mutations. This strategy results in a roughly 75% chance of producing a Golden Clover mutation before your batch of Ordinary Clovers die - which takes about 4 hours and 10 minutes.
The difference between the 2 strategies may be seen here (the x axis is time in minutes and the y axis is the chance of getting a golden clover):

Shriekbulbs
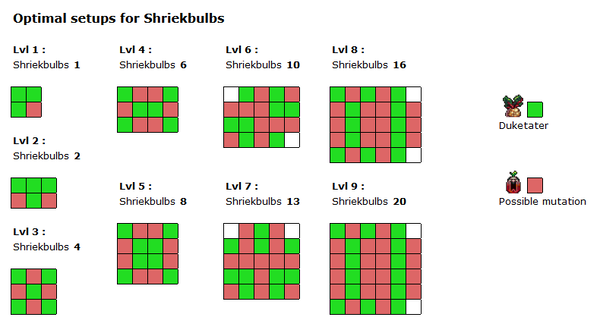
Shriekbulbs are tricky to unlock. Despite the fact that they can be unlocked in one of 7 ways, the odds of one appearing are pretty low in most set ups. The conventional method for unlocking them is by using Duketaters, in which case the picture above shows examples of optimal setups for each Garden Level.
Duketaters are the fastest way to unlock Shriekbulbs, because they don't have to mature to be able to mutate into Shriekbulbs. Alternately, you can use doughshrooms when Duketaters aren't unlocked, and they don't have to be mature to mutate too.
Another possible method best fit for passive playstyles is to plant elderworts. They will never die, but need roughly 140 ticks to be mature and mutate. This strategy can fit passive players, but keep in mind that that shriekbulbs can spread as themselves so there's a good chance that your garden will be overrun with them if you're gone for a long time.
Everdaisies
The image above shows examples of optimal setups for Everdaisies. Everdaisies are hard to grow, because they require the second-most adjacent plants to grow (after Juicy Queenbeets), which means your garden won't have a lot of eligible spots.
Some of the layouts include redundant Tidygrass plants, which can be helpful when some plants mature or die before others due to differences in maturation time. This isn't a concern for Elderwort, which is immortal.
For the setup incorporating a Juicy Queenbeet, they are surrounded by a ring of 8 Elderworts in order to utilize their ability to speed up the Juicy Queenbeet's growth.
Juicy Queenbeets
|
|
|
|
|
- Q = Queenbeet (parent plant)
- J = Juicy Queenbeet spawning space
- N = Non-spawnable spaces
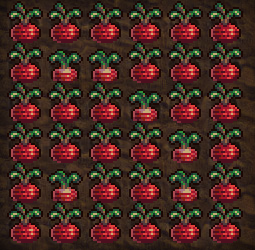
Juicy Queenbeets are the hardest plants to unlock, as they require 8 surrounding Queenbeets and have a very low chance of mutation. The best setup for growing them is to plant a full field of Queenbeets, then when they are almost mature, unearth 4 Queenbeets so that the growth of the 8 Queenbeets around each one be as in sync as possible (most plants grow with a bit of randomness). As a much easier alternative, plant 3x3 "rings" of Queenbeets in each corner, so that the center of the ring can grow a Juicy Queenbeet. The image above shows the amount of rings that can be in each garden level. If price is not an issue, it is advised to plant "independent" rings instead of having Queenbeets belong to multiple rings. This way, if a Queenbeet dies, it will only remove a single possible mutation spot.
It is especially recommended not to use Supreme Intellect when trying to mutate this plant, due to a hidden modifier of the aura that also makes plants grow 5% more varied. Said stat would stack up quickly when there is 8 Queenbeets for each tile, causing the loss of several ticks per attempt due to the Queenbeets de-syncing in growth.
Because of the very low probability of mutation, it is not advised to attempt to unlock Juicy Queenbeets until you have reached level 7 Gardens, which is when you will be able to plant the maximum amount of rings (4).
After a Juicy Queenbeet spawns, it is very important that its growth is optimized. Apart from using Fertilizer and Supreme Intellect, you can also surround it with a ring of Elderworts to utilize Elderwort's ability to speed up the growth of plants around them.
Minimizing seed costs
As you progress further into the game and your CpS gets larger and larger, the cost of planting garden plants will rise in tandem, so trying to unlock some of the more elusive plants out there will often end up costing you an arm and a leg and then some. However, there are a couple of ways to make gardening much more affordable:
- The prices of Garden plants can and will fluctuate depending on which buffs & debuffs happen to be active at any given time, so one can obtain negative buffs in order to cut down plant costs; most commonly done through Wrath cookies, where Clot, Building Rust (rare negative Building Specials), and Cursed Finger (rare) can be used to majorly cut down costs. One can also unslot CpS-boosting Dragon auras, disable the Golden Switch, and more. Most effective during the early game where selling the productive buildings may incur huge negative consequences.
- Sell the most productive buildings temporarily to render cost nearly negligible. This can be done at any time and do not require waiting for any Wrath cookies. One can use the Earth Shatterer aura to further limit cost, making each mass sell only losing at most 4 buildings per building type. Is ideal past the early game where CpS is less determined by amount of buildings (losing 4 out of 500 buildings won't really impact CpS) but by building CpS doubling upgrades which unlock at intervals of 50.
- While this is not very useful, other small optimizations such as freezing the garden when the garden provides buffs to CpS, changing the bakery name to Ortiel, and toggling the Covenant reduces price.
Soil Swaps
Managing soil is important for getting as many mutations as possible. In most cases, use fertilizer for growing plants, wood chips for mutations, and clay for optimizing buffs. Keep in mind that it takes 10 minutes to switch soils. When switching to clay, switch to the soil a tick before utilizing the full buff or else the next tick will have reduced Nursetulip effectiveness and last 3 or 5 minutes. When switching to woodchips, do it at the start of a tick for the swap time to run out faster. If leaving the game for a long period of time, switch soils to something that ages slower for plants to not die when coming back. Pebbles may be used in situations such as unlocking meddleweed overnight or glovemorels that will decay in a tick without being mature.
Hole punching
In most set ups, some plants grow faster than others. Hole punching keeps all possible mutation spots while prioritizing the plants that grow faster.
In the following garden, all but some Queenbeets have matured. Removing some of the younger bloom Queenbeets such as the ring in the bottom left will make spots for Juicy Queenbeets and makes the time waiting for maturity shorter.
Mutation blocking and Ichorpuffs
Mutation blocking is preventing certain plants from spreading to increase the odds of a new mutation appearing in that plot. This is used when mutating around certain set ups such as an everdaisy setup converted into an ichorpuff set up or using a new plant for mutations before harvesting it for the seed. Ichorpuff growth changing makes plants grow slower for more mutation time or have them mature at a convenient time for the player to come back to after being gone for a while. This also extends to elderworts, but with faster aging. Examples may be found here.
Useful Plants
Nursetulip
Nursetulips are very effective at increasing the effectiveness of other plants. In addition, due to how the game orders garden updates, Nursetulip's boost persists when it is unearthed up to when the next tick happens, but the CpS penalty is removed (and this is called Ghost tulip). One could plant more of the same plants in each Nursetulip's place for even more of a plant's effect.
With a full 6x6 garden, the most effective way of using Nursetulips is to alternate between planting rows of Nursetulips and rows of the other plant. This will have a greater effect than simply planting 36 plants of the desired type, at the cost of slightly lowering your CpS. To quickly utilize Ghost tulip, harvest all Nursetulips and replace them with another plant.
| Soil Type | Effect using Nursetulips vs. Full garden in dirt | CpS Decrease |
|---|---|---|
| Dirt | 117% | 39.1% |
| Fertilizer | 95.1% | 29.2% |
| Pebbles/Wood Chips | 62.3% | 9.33% |
| Clay | 142% | 48.8% |
Whiskerbloom
Whiskerblooms give the highest CpS boosts in the later parts of the game due to boosting the effect milk. This makes them useful to fill the garden with for sustained or quick boosts of CpS in any situation necessary. Initially, you should plant them in fertilizer soil to speed up the growing process (minimising your CpS to reduce planting costs), then switch to clay soil once they've matured. (The reduced tick speed is actually quite helpful in this case, as it lets the plants stay mature for longer before needing to be replanted.) With enough achievements & kitten upgrades, the whiskerblooms will result in a massive CpS increase. You can also add in Nursetulips to boost the whiskerblooms' effects, but one would either have to resort to a setup with only 4 Nursetulips or utilize Ghost tulips, which is powerful but only lasts for one tick. The base increase in milk effects from the whiskerblooms (without nursetulips) can reach up to 7.2% once all the plants have matured (or 9% if using clay soil), which is nearly 50% more effective than Breath of Milk and only around 2.5% less efficient than a Diamond-slotted Mokalsium. Even better, since milk boosts (like CpS boosts) stack multiplicatively, using the whiskerblooms in combination with the aforementioned effects will lead to an even greater production boost! Whiskerbloom is also useful for planting right as you stack a large amount of golden cookie effects together while having other plants in the garden beforehand, as they will provide a sizeable boost even as buds.
Click-boosting plants
Thumbcorn is a powerful plant for active players in the early game. It has the second strongest amount of click buff out of all plants and is easily accessible (usually the first plant gotten), cheap, grows very quickly, and lasts a long time when mature. Fill the garden with it, wait for them to grow to maturity, switch to Clay (if available, otherwise use Dirt), then freeze the garden. Then you can unfreeze for a very decent buff to all click-based combos. In addition, due to Whiskerblooms being significantly less powerful due to a lack of milk and kitten upgrades in the early game, it is often the actual most powerful plant for click combos in the early game.
Glovemorel is an upgrade from Thumbcorn that provides double the effects in exchange for -1% CpS and +1% Cursor CpS each. However, it has none of the other benefits that Thumbcorn have, and grows notoriously inconsistently with a very short window for use. In addition, they become worse than Thumbcorn as more of them are used due to the -1% CpS. They are mostly used in very advanced setups with Whiskerbloom during large combos for small buffs, or during midgame where Cursors make most of one's total CpS.
Golden Clover
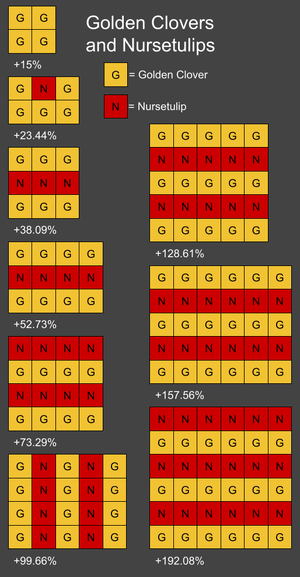
Filling up an entire 6x6 field with Golden Clovers will grant a 108% increase in Golden Cookie frequency when all plants are mature (135% if using clay soil; 192.08% with 18 strategically placed Nursetulips, although this decreases the cps by 48%; and 201.92% with Ghost tulip.). This can lead to a Frenzy lasting for many minutes on end, because a new Frenzy cookie will likely appear before the existing Frenzy has ended, extending its duration over and over and over producing endless Frenzies. The increased Golden Cookie frequency also increases the chance of getting combo effects, which can potentially yield massive amounts of cookies. These set ups may be rotated in any way.
Its most important uses is in massive late-game combos where it and Nursetulips combined, allows for stacking Frenzy, Dragon Harvest and Building Special from exclusively naturally spawned Golden cookies and still have an additional natural spawn before the Building Special ends, providing either a +123% CpS bonus to any combo through the Dragon's Fortune dragon aura or to potentially provide an additional Dragonflight or Building Special.
Garden combos
Garden combos are a weaker version of click combos because they are capped by bank. Garden combos are based on garden plants such as Bakeberries and Queenbeets giving cookies when harvested. Assuming a level 9 garden, a full garden of Bakeberries give a x2.9 boost of bank and a Queenbeet garden gives a x4.1 buff. While Duketaters may seem like a good option, its growth is too inconsistent to properly use.
Niche plants
- Wrinklegills may be used to optimize shiny wrinkler hunting
- Queenbeets may be used to extend Golden Cookie duration when Save Scumming
- Chimerose may be used to get Reindeer biscuits or the achievement Reindeer sleigher quicker
- Just like Dotjeiss, Cheapcaps may be planted to make buildings or upgrades cheaper.
- Fool's bolete may be used for more Dragon Orb usage for the Sweet effect.
- Elderworts, Ichorpuffs, Tidygrass and some self spreaders may be used to alter aging and increase certain mutation chances. See here for more information.
Obtaining Garden drops
Garden drops are the flavored cookies or upgrades that can be rarely unlocked upon harvesting the mature version of some plants. They stay unlocked through all future ascensions.
The most important thing in obtaining garden drops is optimizing for random drop chance in order to maximize the chance of getting each drop per harvest. This can be done by:
- Utilizing Cosmic beginner's luck (heavenly upgrade, x5)
- Mind Over Matter and Reality Bending (dragon auras, x1.275 when used together)
- Santa's bottomless bag (upgrade, +10%), Dragon teddy bear (upgrade, +3%), Green rot digestives (Green rot garden drop, +3%)
- Keenmoss (plant, +3% each by default)
In addition, the Seedless to nay achievement obtained upon sacrificing the garden for the first time makes garden drops 5% more common.
For most garden drops, one should try to have everything detailed in the first three bullet points, fill the garden with the target plant, and use as many things that boost plant growth as you can get hold of (Fertilizer soil, Supreme Intellect, etc.). Then, harvest each plant when they are mature and replace with a new instance of said plant. One may also plant Keenmoss in their place to further boost random drop chance for future harvests if the former is not reasonable (especially in the case of Duketater due to their high maturation time, low amount of time when mature, and high likeliness to age wildly) and then replace them.
For Ichor Syrup from Ichorpuff, use Pebbles or Wood Chips in order to minimize the age growth slowing due to Ichorpuff's ability to slow down growth for all plants around it. As an alternate strategy, place them in rows or columns separated by 1 tile each so that each Ichorpuff is affected by a maximum of 2 other Ichorpuffs only; then, plant Keenmosses in the space between Ichorpuff row/columns and try to have them mature on Clay as soon as the Ichorpuffs begin maturing.
Grinding Sugar lumps
For sacrifices that contain save scumming, check here.
The garden is one of the most powerful tool in helping one obtain Sugar lump quickly, via sacrificing the garden quickly. This can allow to somewhat consistently sacrifice for 10 Sugar lumps (and +1 from the Juicy Queenbeet) per 5.5 days, tripling the natural lump coalescing rate. Here is a quick overview to sacrifice the garden quickly:
- You should always use Fertilizer. The only times when Wood Chips should be used is while attempting to mutate Bakeberry, Queenbeet, or Juicy Queenbeet (and Elderwort if not gotten before Juicy Queenbeet).
- You should have a large garden. 6x6 is pretty much mandatory.
- After a sacrifice, repeated ascend until a Meddleweed spawns in the garden, then immediately rush for Bakeberry. Get any other plants you can get from the wheat family (Thumbcorn, Cronerice, etc.) during the Bakeberry attempts.
- After Bakeberry is on the garden, try for Brown Mold and Crumbspore from Meddleweed. Make sure to harvest any Meddleweeds orthogonally adjacent to any of your other plants before maturity to avoid the Meddleweed contaminating them. Then, get Chocoroot, White Chocoroot, and Tidygrass.
- Get any other plants if you can
- Once the Bakeberry is 6 ticks away from mutation, plant Chocoroot around them to try for Queenbeet, maximizing for the amount of eligible tiles (you should be able to always have at least 7 if there's no other plants in 3x3 around the Bakeberry)
- While the Queenbeet grows, get Tidygrass (if haven't done so yet) then get any other easy plants. Make sure to continue through the wheat family as much as you can.
- After the Queenbeet is done start trying for the Juicy Queenbeet. Use a 5x5 setup and use the remaining space to try for Elderwort (or Shimmerily if you haven't gotten them yet)
- After Elderwort spawns, feel free to use the Cronerice for getting Wardlichen if not done so already (via White Mildew). Switch back to the 6x6 setup after the Elderwort matures.
- If time allows, it is possible to get Drowsyfern while going for a Juicy Queenbeet before planting a third generation to mature overnight while not interfering with Juicy Queenbeet rings (If the Drowsyfern mutates in the center, then unearth it.
- After Juicy Queenbeet spawns, set up the Elderwort part of the optimal setup for Everdaisy (using the setups that incorporate Juicy Queenbeet growing; check above for such setups), then try for Drowsyfern for a while. Immediately start planting the Tidygrass part of the setup once the Elderworts are ~70 ticks until maturity (but leave the Drowsyfern alone if you have it).
- After Everdaisy, unearth some (but not all and none of the Elderworts surrounding the Juicy Queenbeet) Elderworts to make as many tiles as possible for Ichorpuff mutations. Start planting Crumbspores and try for it.
- After Ichorpuff, get the rest of the plants that you don't have.
- It is imperative that you use the Baker's Wheat + Gildmillet setup for Golden Clovers, as the clover setup becomes very restricted with an Elderwort ring on the garden.
- Hopefully you get every other plant before the Juicy Queenbeet matures. Congratulations! Now you can claim your 10 lumps.

